9.21.2009

Plant Surgery, Antietam-Style


This weekend I acquired my first Schefflera. In it's previous life as a bonsai, it was performing poorly and headed for disposal when my friend Julia came upon it. It was graciously donated to me.


As you can see, this bonsai habit is what we technically call "jacked up." And it's no wonder... the roots are cemented into the pot by a top-layer of gravel and glue, as big box stores often do with bonsai for some inexplicable reason. Nonetheless, it is perfect for one thing: pyrotechnics.

What? Pyrotechnics? No, just kidding. What I really meant was Air Layering.

Air layering is a propagation method. Air-layering requires some labor and patience, but it's a great way to revive a plant that has become tall, top-heavy, or bare along the trunk. It works with specifically non-herbaceous or woody plants. The process allows new subterranean roots to grow in the air along the stem. This is achieved by partially severing the main stem/trunk and then tricking it into thinking it's underground. When the new roots have grown sufficiently, you can sever the trunk, and ta-da! New plant, ready for potting. Here's how.

Assemble your Air-Layering tools:

A small, sharp, sterilized knife*
A clean paintbrush*
Rooting hormone powder
Long-fiber sphagnum moss (one handful)
Plastic wrap
Tape or twist-ties

*Always use clean tools. This is modern amateur plant surgery, not Civil War whack-a-limb. Have you been feeding whiskey to your schefflera-patient as well? For shame.


Okay. Step one. Using your knife, take an angular incision along the stem of the plant at the desired height. Make sure there is a leaf node (or adventitious root protrusion, if applicable) above the cut. Remove any intermediate leaves, leaving a bundle of the topmost growth. Angle the cut upward so that you have separated (but not removed) a small flap of stem tissue. What you are cutting is called a "tongue," so that may give you an idea of what it should look like. Also, the cut should be shallow- less than halfway through the stem, or the upper portion will die.

Step two. Brush the cut with rooting hormone powder.

Step three. Get your sphagnum, and moisten it with clean water. Squeeze out the excess. Wrap the wad of sphagnum around the cut as if you were dressing a wound with a bandage.


Step four. Take your plastic, and wrap it around the sphagnum bandage. Secure it in place with your tape. All done! Give your plant a little pat-pat, and resume regular watering in a few days.


Holy crap! That was so easy and enjoyable. Now just keep the dressing evenly moist, and you should expect to see roots forming after a few months. Water from the top of the dressing, with a dropper or something similar, rather than opening the dressing and inviting bacteria. Wait until you see roots through the plastic before you remove it. Then you can sever the stem just below the roots (don't leave too much extra; it will rot) and plant in the smallest suitable container.

Good luck!


A Medley of Extemporanea


Oh, life is a glorious cycle of song;
a medley of extemporanea;
And love is a thing that can never go wrong;
and I am Marie of Romania.


-Dorothy Parker, 1925

I was reminded of this poem today, when I discovered two things. First, my Euphorbia tirucalli cutting showed its first signs of new growth!


And in a glorious cycle of song, my cat cleanly removed all the new growth from my Aloe parvula "Jacobsonii."


How karmic. One more pertinent Parker quote; asked to use the word "horticulture" in a sentence, Parker immediately replied, "You can lead a horticulture, but you can't make her think." Next time, I will think before I move my plants.

9.15.2009

Cheap ideas!


Just a few ideas to maximize your houseplant enjoyment, totally free.

1) Calibrate a hygrometer. Based on this excellent how-to article for cigar humidors, you too can turn your crappy analog hygrometer into a tool of fastidious precision! If you don't have a hygrometer, this is still a "cheap idea," because they are inexpensive and available at most hardware stores.

2) Save your favorite glass bottles and start propagating! It is definitely auspicious to have some tribute to PeeWee, the patron saint of vibrant homes.


3) Clean some humidifiers in preparation for the coming onslaught. If you plan to have one or several humidifiers running this winter for the benefit of your houseplants, it's wise to get familiar with the humidifier-disinfecting process. Otherwise your home will rapidly become redolent of Mrs. Whoever's third grade class fish tank. You know what I mean. If you are using a warm-mist humidifier (tut tut) don't forget to finish with a bleach dilution.

4) Pick up an interesting plant book from your local library.

5) Get creative with plants you already have. Try making a bonsai or topiary out of something unusual. I'm currently attempting to train a sansevieria to have curly tips. Think it'll work?

-NA

9.14.2009

Renegade Craft Fair


The Renegade Craft Fair Chicago-stop took place this past weekend in Wicker Park. I imagine that it's sort of like the Renaissance Fair, but replaces the theme "ye old cosplay" with "hipsters, irony, and felt." I attended with three of my craftiest associates, and we were unanimously amazed. But what of the plants, in particular?

Well, you'd be surprised at how many people were using plants as display-enhancement. Pots of succulents were scattered about trays of homemade buttons and resin barrettes. Little tufts of moss held delicate hand-made jewelry (sadly all the moss I encountered was fake... it is possible to keep pads of moss alive for this purpose). One station was even selling tiny crassula offshoots in film canisters, for a not-so-tiny price. Asking the vendor if I could take a photo, I overheard a fashionable fairgoer looking at these pots and exclaiming, "Ugh, this jade stuff is so popular right now."

Link
I think I see a "Gollum" in there

This gave me the chuckles. Really? Popular like colored wayfarers are popular? I know that propagating your own plants is DIY and awards you eco-points (the indie-kid Holy Grail), but I had no idea it was in vogue. Do people go into Bucktown bars with their jade plants and their neck-bandanas, and make the other patrons say, "Well, we were bringing jade around here before all these other poseurs"? For goodness' sake! Stick to growing tomatoes and weed, like normal hipsters.

Anyway. There was one vendor there that I thought was particularly wonderful: Photosynthesis. Here is a screenprinting artist who loves ferns and wants to shout her love from the rooftops, which I can get behind. Needless to say, the "Fern and Ginkgo Silk Skirt" is on the christmas list.


-NA


Just for Aesthestics


9.08.2009

Top-dressing Clever Girl


As promised, here is an experiment that grew from a conversation I had with one of the employees/Plant Wizards of Pesche's greenhouse.

The problem: I recently acquired a Cyathea cooperi (Australian tree fern) in a ten inch pot. I will be attempting to keep it alive indoors this winter. Internet research has yielded unto me that Cyatheas are very heavy feeders, often receiving monthly emulsions of things like blood and bone meal when grown outdoors in warm climates. Being a prehistoric plant covered in sharp scales and feasting on blood and bones, Boyfriend settled on a name for our tree fern: Clever Girl.


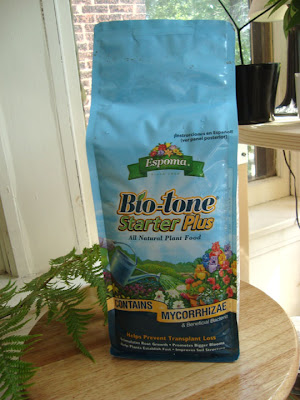
But what to feed Clever Girl? I refuse to pour out repugnant, smelly emulsions in my apartment. And being in a pot, the concentration and administration of said grossness would need to be adjusted. Also, pot culture also lacks a much of the soil bacteria that tree ferns enjoy, and how would I account for that with fertilizer? The good folks at Pesche's had an interesting suggestion: Espoma's Biotone.Link


Biotone is a fertilizer medium that helps transplants survive. It contains small amounts of all the aforementioned gross things, including the bacteria. Now, I couldn't figure out exactly what kinds of bacteria tree ferns need, so this could be as pointless as fertilizing with Brawndo, the Thirst Mutilator (it's got what ferns crave! bacteria!). Nevertheless, Plant Wizard seemed pretty confident about it, and I trust him. I have never used this product before, and so I am not endorsing it in any way. Yet.

Here's what it looks like. It stinks a wee bit.

Plant Wizard and I also realized that, being a fertilizer medium, Biotone could be applied as a top-dressing. Now we're back to the fun stuff.

LADY, WHAT IS TOP-DRESSING? WHY DO I CARE?

Top dressing is a technique used to deliver fresh, un-compacted, nutrient-rich soil to plants that are too big and heavy to repot. You should care because you've probably got some miserable dracaenas laying around the home or office, in huge pots, that haven't had a soil change in fifty years. You make me sick.

Here's how to top-dress!

Step 1: Assemble your tools. You will need a toothpick or skewer, a disposable spoon, an empty container, and (depending on the size of the plant) several cups of your medium-of-choice. I used about 1 1/2 cups of Biotone, as per package directions.

Step 2: Using your spoon, scrape the first couple of inches of topsoil off your plant. Don't break up any roots, if you can help it. Dump the loose soil into the container.

scrape scrape

Step 3: Check the loosened soil and the exposed soil surface of your plant. Bugs? Fungus? Bad smells?


Step 4: Take your skewer and give the exposed soil a good stabbos. This will aerate the old, compacted soil.

Step 5: Pour on your potting medium and spread it out evenly. Make sure you're not burying any stems, vines, or new growth, and never bury the crown of ferns or rosette-forming plants.


Lovely! Top-dressing accomplished. You can top-dress your behemoth potted specimens every spring as a substitute for potting-up, and you might consider simply repotting if you can lift them. Technically, repotting is different from potting-up in that it constitutes pruning the roots, changing the soil, and then putting the plant back into a container of the original size. Repotting is ideal for plants that we intend to grow slowly or plants whose size we intend to control (i.e. bonsai and large indoor plants). Potting-up means placing a plant into a larger container where it will have room to grow larger. For the purposes of this blog, however, I often use "repotting" to mean repotting and potting-on, because I am reproachably lazy.

Anyway. Updates on Clever Girl will be provided.

*Jurassic Park photo: http://thepensblog.blogspot.com/


9.07.2009

Overwintering your Alocasia


Many greenhouses around the Midwest were selling big Alocasias (a.k.a. Persian Palm, Giant Elephant Ear plant, or Taro) this summer out with their annual and perennial garden bounty. They're related to your common African Mask plant (Alocasia amazonica), but bigger. They come in a variety of styles, all lending a distinctly exotic/tropical feel to American gardens. Here in Chicago, you've probably seen them a lot this summer in storefront garden arrangements. They also make awesome houseplants!

Link
Alocasia calidora, March 2008

But what about winter? In some places in the United States, Alocasias can be allowed to die back to the bulb during winter and successfully return in spring. They will not survive hard frosts or temperatures in the teens, however, so in the more northernly latitudes, this is not an option. The assumption is that, like most of our summer garden plants, we will simply throw them away.

Alocasia (portadora?) in Rogers Park

But you don't have to! Alocasias are cumbersome, finicky plants, but it is possible to keep them alive until next summer. Here's some tips for overwintering your Alocasia. Coincidentally, this is a perfect opportunity to talk about prepping all houseplants for the indoor winter.


Acclimatization is the name of this game. With any tropical plant that lives outdoors for the summer, the process of moving indoors can be stressful. Changes in light (strength, direction, photoperiod, etc.), changes in humidity, changes in air circulation... try to keep these things in mind when choosing a place for your plant indoors. You want to mimic the conditions to which they have become accustomed, a.k.a. acclimatize them to the new situation. Sometimes I like to start early (before cold temperatures necessitate a sudden move) by bringing my plants indoors for a day or two at a time, then back out to their previous spots. Some people will reasonably argue that the extra moving stresses the plants, but I believe acclimatization is most effective when it happens gradually.

Light should generally be the same or a little brighter... remember that outdoor shade is still much brighter than indoor shade. This does not mean put them in intense, direct sun - just someplace that receives several hours of bright filtered light every day. Alocasias in particular will not do well in the dark.

Humidity must be increased. The central heating systems in most northernly homes will decimate and dessicate all but the toughest plants. Spider mites also capitalize on dry and stressed plants, so take precautions. Add a cool-air humidifier or vaporizer. Add pebble trays. Group your plants together. Got radiators? You can buy plastic radiator humidifiers very cheaply at most home improvement stores. You can even decorate them. For your Alocasia, you also might try misting. Misting is a great debate among houseplant people... I mist because I really, really enjoy it. However, it must be a very fine mist, otherwise you're just getting your plant wet. Make sure to mist the underside of your alocasia's leaves. To prevent sunburn and sunspots, avoid misting heavily when sunlight is the strongest... try for afternoon and evening.

Watering must be gradually decreased. With the naturally reduced winter photoperiod, your plants will go into a resting period. New growth will come slowly, and all resources will be more slowly metabolized. Giving them the same amount of water as in spring or summer, when all engines are running, will be too much. Root rot and fungus gnats are the ensuant problems in this scenario. Here's one approach... wait until the soil looks dry. Stick your finger in the topsoil up to the first joint. Still feels dry? Try lifting the pot. With big and beefy plants like Alocasia, just tilt the pot to get a feel for the weight. If the pot feels light, chances are it's safe to give them a little drink. Alocasias in particular appreciate light, consistent moisture. I know that's a lot of conflicting information... all I can say is, with practice you'll get the hang of it.

Fertilizing must be decreased, for all the reasons above.

Some plants may need to be potted-up. Did it grow like the dickens this summer? Look at the bottom of the pot... are roots exploding out of the drainage holes? Does the plant seems constantly thirsty, or does it wilt quickly between waterings? It may be potbound (cue dramatic chipmunk music). Potting-up should typically happen in spring, however, some plants that have put out huge flushes of new growth over summer will benefit from a potting-up in fall. Try to do this early. The plant should have time to adjust to it's new pot before it comes inside. Hold off on the watering for a while... water will pool in the fresh compost that does not yet contain roots, which we know = stagnation, root rot, and fungus gnats. Also, do not overpot. I repeat, do not overpot. The new pot should be one inch bigger in diameter than the old pot. This will save your hiney!

Not ridiculously potbound, but definitely needing more room.
The bottom roots had cracked the plastic pot.

For Alocasias, which are extremely top-heavy, this is a good time to install stakes.


Finally - I cannot stress this enough - before your plant comes indoors, check for pests and take appropriate measures. If your plant lived outdoors this summer, chances are high that it has picked up some opportunistic fauna. Before you even clean the plant off, check for pests. Check stalks, stems, roots, pots, and the undersides of leaves. This is the best time to spot that heinous scale infestation and throw the plant away... before it takes down your entire plant collection mid-January. If you see just a couple of enemy combatants, take them out with a q-tip dipped in alcohol. Then, it's on to the bath. Small plants can be gently showered in the sink. Large plants like Alocasia can be wiped down with a damp rag. You can use a dilute solution of insecticidal soap, if necessary. This is your second line of defense in the battle against hitchhikers. If you have confirmed the presence of insects, isolate the plant and continue treatment. More detailed information on chemical warfare will follow in upcoming posts.

Link
Ta da! Now, hopefully, your green pets/experiment subjects will be adjusted and content in time for winter.

9.05.2009

Confessions of a Plantaholic


So today I happened to be cruising Des Plaines, IL, and found time for a shopping trip at Pesche's. Let me draw you a quick analogy.

Plants: Pesche's :: Thoroughbreds: Kentucky Horse Park.

Pesche's is a rambling, palatial estate of a greenhouse that offers separate rooms for indoor and outdoor plants, indoor and outdoor tools, indoor and outdoor curatives, and indoor and outdoor pottery. They also have special areas for garden tchotchkes, seasonal/holiday paraphernalia, and lady's fashions. If you buy a pot with your houseplant, they will whisk it away like Christmas elves to their giant indoor potting benches and bring it back to you daintily assembled, with two little mints sitting on the topsoil. They have terrariums so big, you could grow vegetables in them. If you come in and tell them that you need a systemic that prevents unicorns, they will have it.

I'm exaggerating a little, but not much. The only downside to the magic that is Pesche's is that it is wicked expensive. A 5" or 6" pot of even the most common crassula will run you about $18. Really, you get what you pay for (the plants are all in great condition) but that doesn't make them more accessible to a fabulously poor girl like me. Fortunately, you mostly get treated the same regardless of whether you're there to buy a thousand dollars worth of espaliered trees or five dollars worth of twist-ties. One employee was kind enough to show me their SUPER-COOL garden microscope, which takes photos and videos. If you bring in a suspicious lobe/frond/leaf, they will pop it in the microscope and reveal whatever frolicking critters reside there.

In an uncharacteristic show of restraint, I decided to ONLY purchase the tools and chemicals I needed, rather than a glut of plants. I received some really interesting suggestions from the employees, and I'll share the results of these experiments in upcoming posts.

I did buy one tillandsia (noid). But I don't think that counts, do you? It's teensy.


9.03.2009

Powdery Mildew!


Remember my catnip? In my lush, lovely windowbox?

Well I whacked it, mob style. Do you want to know why? Powdery mildew! My first encounter. That's when I started noticing, all over the north side of Chicago...

Powdery Mildew! (Edgewater)

Powdery Mildew! (Loyola)

Powdery Mildew! (Rogers Park)

Powdery Mildew! (Also Rogers Park)


Houseplants rarely get powdery mildew because indoor conditions are too dry. However, plants on a patio vacation for summer may contract powdery mildew through airborne spores. The treatment indoors or out is basically the same... remove affected leaves, apply fungicide if needed. Unfortunately, fungicides which are sold for this purpose (and often loudly tout their safety with indoor plants) are often much too harsh. Ferns in particular are sensitive to most chemical treatments, even dilute soap sprays. Always use chemicals as a last resort, use sparingly, allow free drainage of the chemical (no cachepots) and test a small section first. Or you could be like me, and deep-six the whole mess.

As for all the powdery mildew around town, I have no idea. I guess that many outdoor plants can contract powdery mildew yearly in spring and summer without sustaining too much damage, but it seems like it's everywhere, and destroying a lot of the spring flushes on neighborhood trees. It's even in the trees right outside the windows of my plant room, so I'm a little concerned about it entering the compound when the windows are open. We'll see.

9.01.2009

The Cyathea Has Landed


Well, it finally happened. I acquired my first Legit Tree Fern. After much heartbreak with a trunking fern of the Blechnum persuasion, I searched high and low for a suitable replacement. As much as I love to shop for plants online, the prices are usually prohibitively expensive. Also, tree ferns are just really goddamn hard to find. You can imagine, then, the enormity of my freak-out upon finding a big beautiful specimen of Cyathea çooperi at Heinz Brothers Greenhouse in St. Charles, IL.

I went into Heinz Brothers to see if they carried vermiculite. Very few places do anymore... apparently there's something about the mining process that is a bit naughty. I felt pretty guilty about this purchase, so I wandered around the greenhouse for a while clutching the bag like a vermiculite junkie and rationalizing, "I just need a little bag, and I'll make it last... then no more..."

I turned a corner, and BAM! There were the Australian tree ferns (also known as scaly tree ferns). These monsters were in ten inch pots, about three feet tall and about four and a half feet in diameter. They were expensive, and deservedly so. I left Heinz Brothers with only my vermiculite and a deep, deep longing.

Later I emailed them to ask if the ferns were a part of their summer sale. They were not (flowering tropicals only), but the person who responded to my email offered me a bad-ass discount nonetheless. So I returned. I combed over the selection, trying to find one with some new growth, and settled when I found THE CROZIER TO END ALL CROZIERS.

There was one setback- in the upper branches, nesting like majestic pterosaurs, were a couple of huge mealybugs. But the plant was in such good condition otherwise, and it was such a good deal on a rare find, I didn't really mind. Into my car went the fern, where it spent the car trip trying to hug me from the back seat and showering me in needle-sharp hairs.

Now it is safely home, and hopefully adjusting. I don't have enough room to isolate it entirely, so I have it sitting in the corner of the plant room, with my mealybug mis-en-place close at hand.

Link
-NA

Nature Assassin: Tokyo Drift


Get ready, these next few posts are going to be fast and furious.
Vin for the Win!*

Anyway. Wha.... oh yeah. Plants.

Ledebouria (socialis?) has bloomed a-gain. The flowers aren't particularly pretty, but they are interesting at least. Dave's Garden lists other common names for this plant as Violet Squill and Silver Squill. What the hell is a squill?


This species reportedly hails from South Africa. I picked mine up from Ted's Greenhouse in Tinley Park, IL. Ted's is really a neat place... they have an incredible variety of cacti and succulents, and they label much more meticulously than most greenhouses. I've purchased three lovely and unusual sansevierias from them - ballyi, ehrenbergii and halli "baseball bat." The other great thing about Ted's is that their young specimens are often available in tiny, inexpensive pots... two inchers are usually two or three bucks, even if you're getting a rare variety. This is great for people like me with limited funds and plenty of patience for little plants. One time I was there eyeing a group of sans in a big pot, and an employee asked if I wanted to buy it. I told him I was really looking for just one specimen rather than the whole big expensive pot. He grabbed a big offshoot from the parent plant, hacked it off, and made me an offer!

One more ledebouria photo.


CHECK OUT MAH NEW TABLE! I made it myself. Well, me and IKEA. It was hella cheap, and suits my purposes nicely. I've got my terrariums down below (updates on that project to follow) and my high-light plants (bananas, BOPS, etc) sit on top. It also serves as a workspace for repotting, checking for pests under clamp-lights, any anything else that might make a mess. I had previously used my drafting table for this purpose, and now that we have something more appropriate, we have our drafting table back in the living room. Boyfriend is pleased because he is afraid of the plant room, with its ensuant spines, barbs, toxic sap, and insects.


Of course, moments after this picture was taken, the table was completely cluttered with plants and books, and three piles of vomit appeared thereupon. The responsible party has not stepped forward, but evidence showed traces of Ficus pumila, so the case is not closed.

That's all for now.

Endnote: I seriously love VD. I did a life size oil painting of him in college. When I briefly interned at Fantagraphics in Seattle, my boss and I loved to talk about The Chronicles of Riddick, particularly how he showers with his clothes on and doesn't use big guns. My theory is that - unlike other beefcake action heroes - Riddick doesn't wield many phallic weapons because he IS a phallic weapon. From his rippling pecs to his shaved head, the man is like a total-body erection. I could 'Intro to Gender Issues' that shit all day. Add in spaceships, sweet-ass costumes and ridiculously bad acting, and it's pure cinematic gold. They should make 100 "Riddick" movies. Throw Bill Nighy in a couple of them. I will see them all.